
Overview
The Vport Media Player on Apple Vision Pro lets you watch immersive concert experiences in a spatial environment.
Before the player opens, you’ll see an Event Access Modal that can show:
- Event name
- Duration
- Price (free or pay-per-minute)
- Your wallet balance
Depending on your balance, you can:
- Teleport into the event
- Charge your wallet
- Explore free events
The current app chooses the presentation from footage metadata and on-device capability detection:
- A native floating player for standard and spatial footage
- A progressive immersive player for supported APMP, 180-degree, or 360-degree footage
- The native floating player as a fallback if the immersive space cannot open
The native floating player uses visionOS playback controls plus a VPORT Info tab with event-instance details and Report. The immersive player provides VPORT controls for play/pause, 30-second skipping, seeking, volume, event info, reporting, available quality renditions, and Lock Drag Rotation.
There is no universal free first-30-second preview. Free events are identified as free before playback; paid usage is based on recorded active play time at the displayed event rate.
Purpose (User Value)
The media player is built to:
- Make immersive watching easy without extra hardware
- Use familiar VisionOS-native controls (gaze + pinch)
- Provide event info directly inside playback
- Allow quick reporting of issues
- Deliver a comfortable and intuitive media experience for Apple Vision Pro users
This is the central place where you control any Vport viewing experience on VisionOS.
How to Use (Step-by-step Guide)
3.1 Opening the Media Player
- Launch Vport on your Apple Vision Pro.
- Look at the event you want to watch.
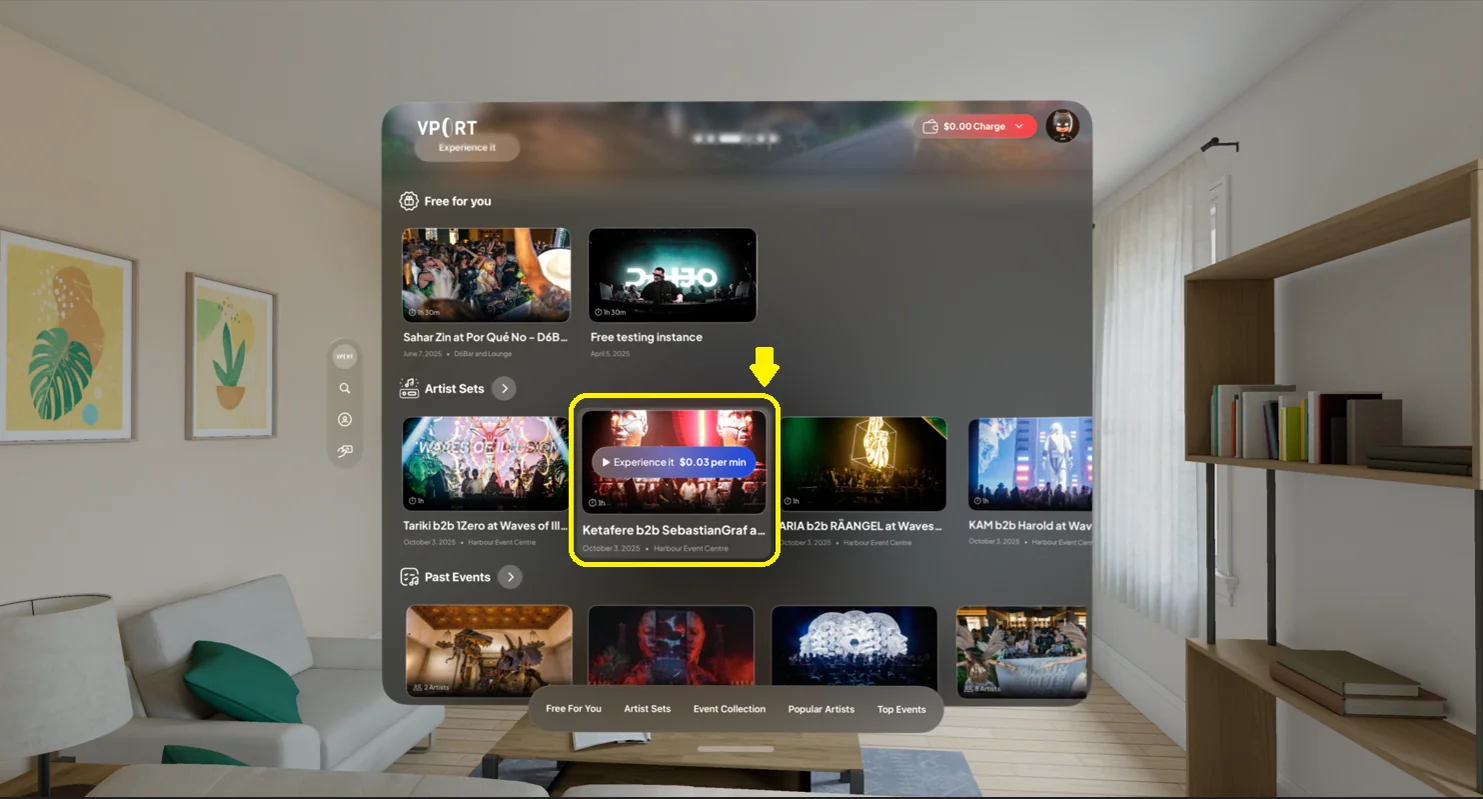
- Pinch to open the event.
- The Event Access Modal appears (see below).
- Select Teleport Now (if eligible).
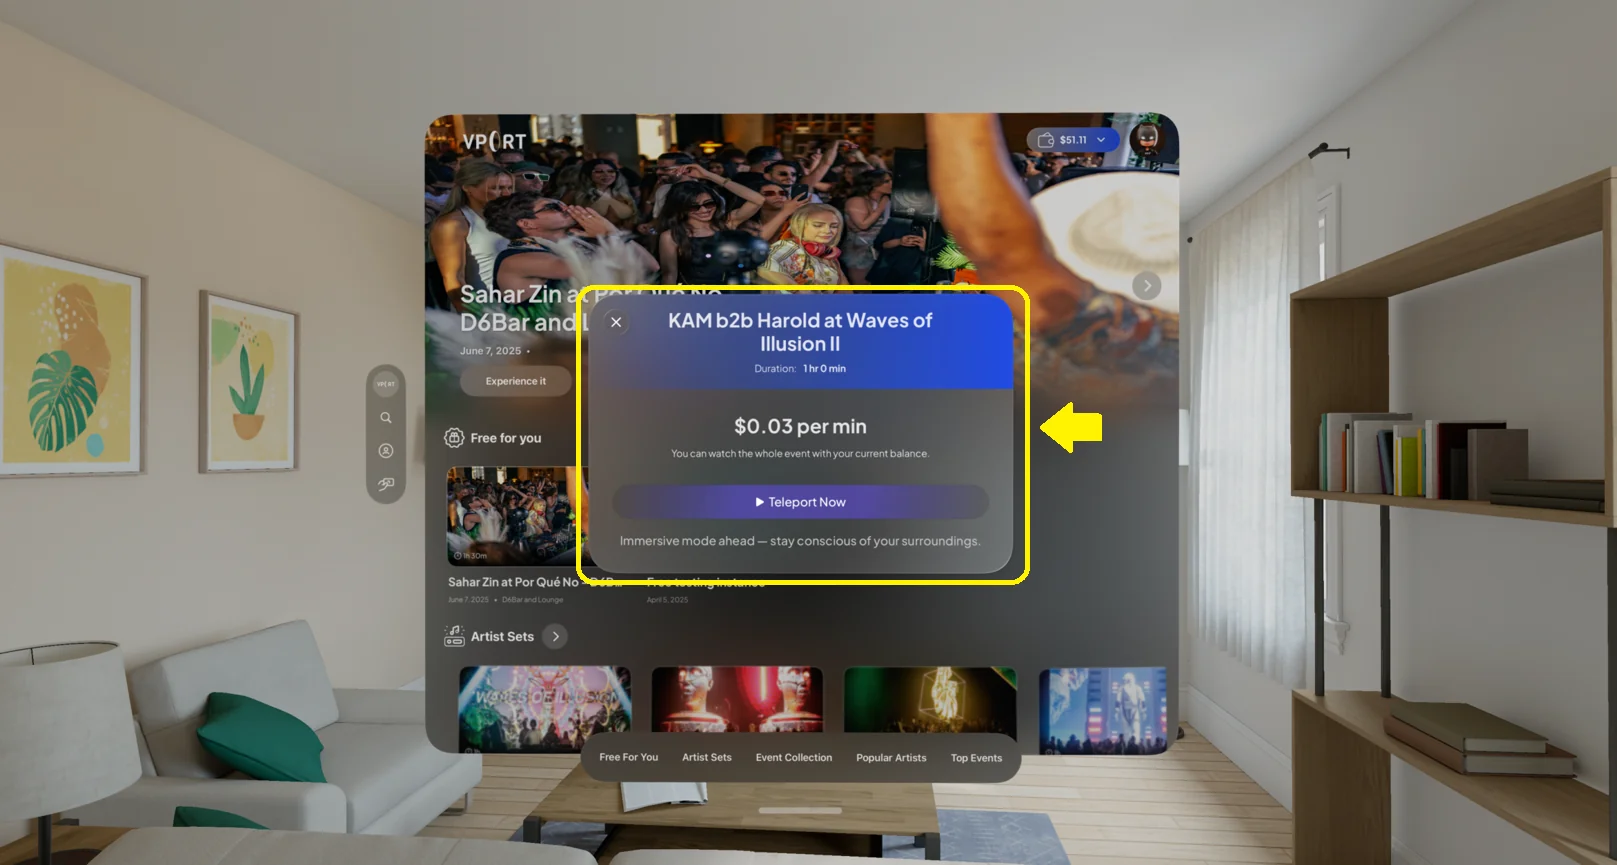
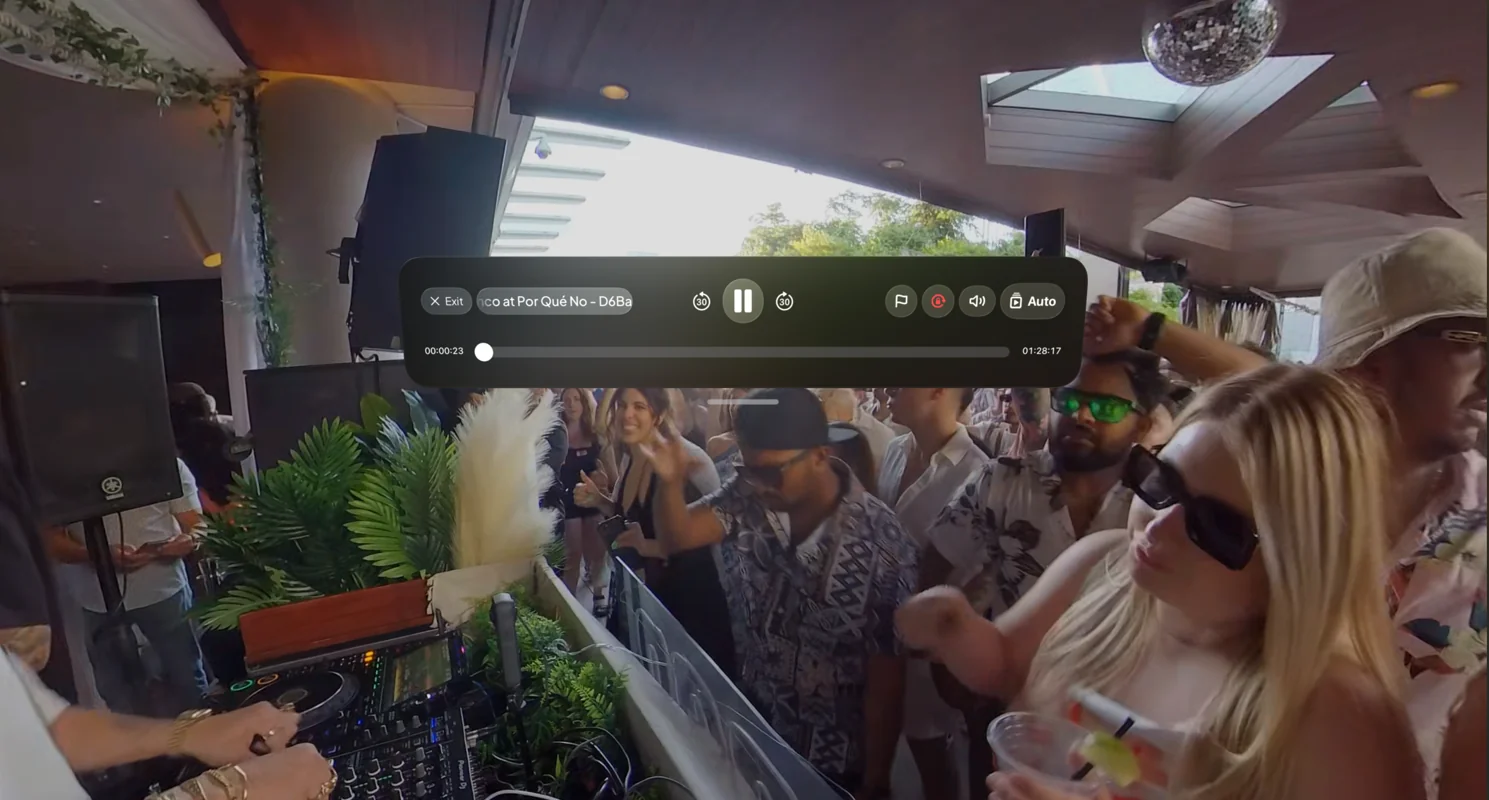
- The media player opens in the presentation supported by the footage. If an immersive space cannot open, VPORT can fall back to a window.
3.2 Event Access Modal (Pricing & Balance)
When opening an event, the modal shows:
- Event name
- Duration
- Price (e.g., "$0.03 per min") or “Free event”
- Wallet balance
3.2.1 Paid Event – Enough Balance
You see:
- Price per minute
- Note indicating your balance is sufficient
Button: Teleport Now
Playback will begin, and usage charges apply based on the event rate.
3.2.2 Paid Event – Not Enough Balance
If balance is below the current $5 minimum for a paid event:
You see:
- Current balance
- Message indicating minimum credit required
- Buttons:
- Watch free events
- Charge Wallet
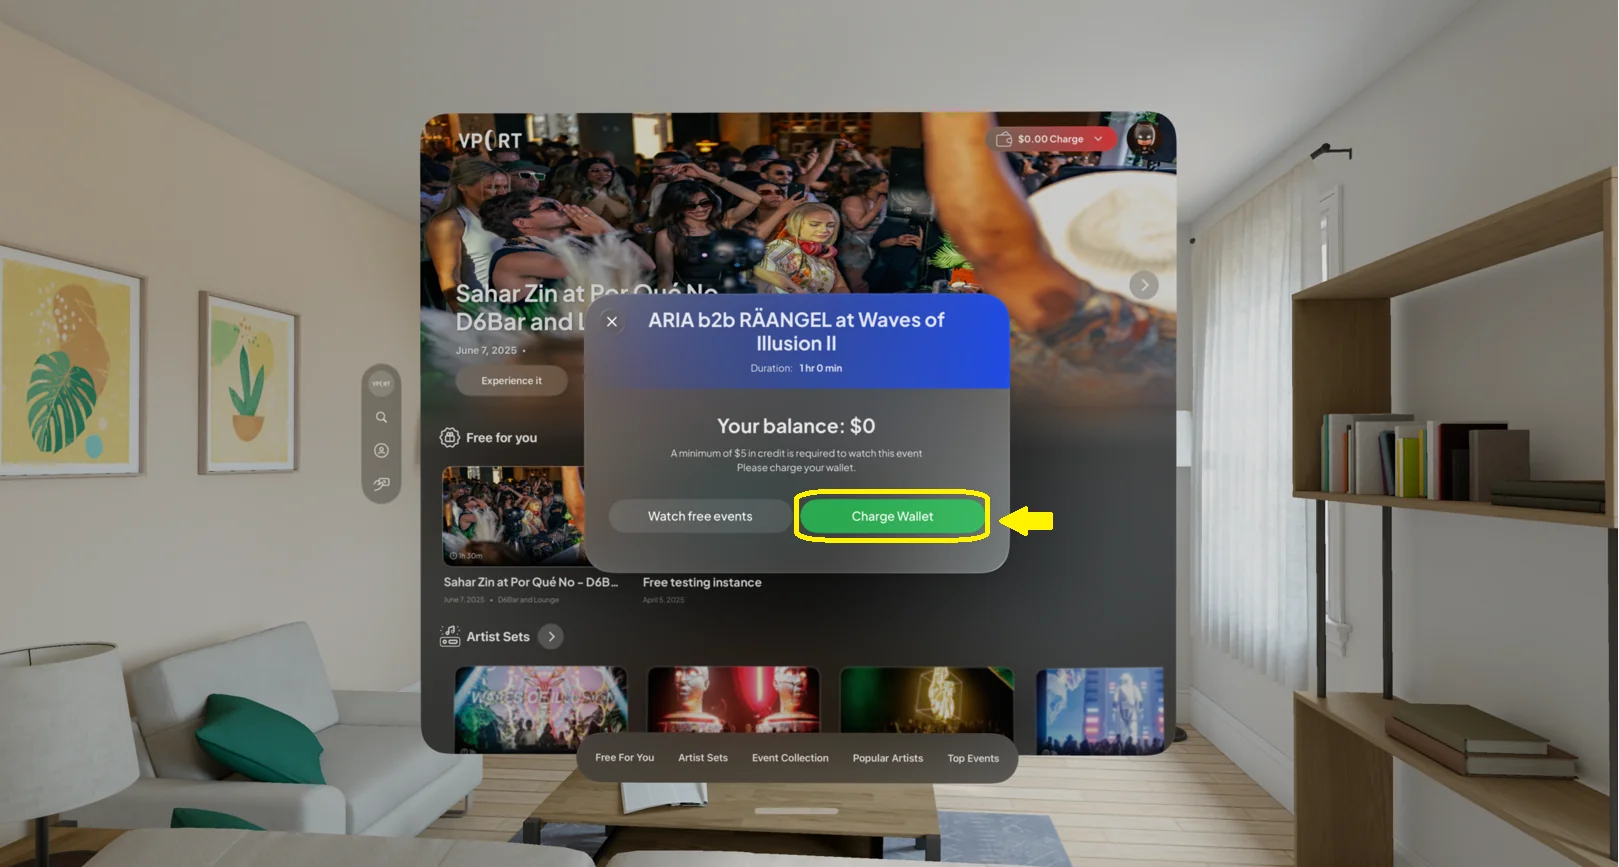
Teleport Now is not shown until balance requirements are met.
When the balance is at least $5 but lower than the estimated cost of the full event, the modal can show the available minutes and offer both Charge Wallet and Teleport Now for pay-as-you-go entry. If a Charge Wallet or Watch free events shortcut does not open in the installed build, close the modal and use Home's wallet or Free For You destination.
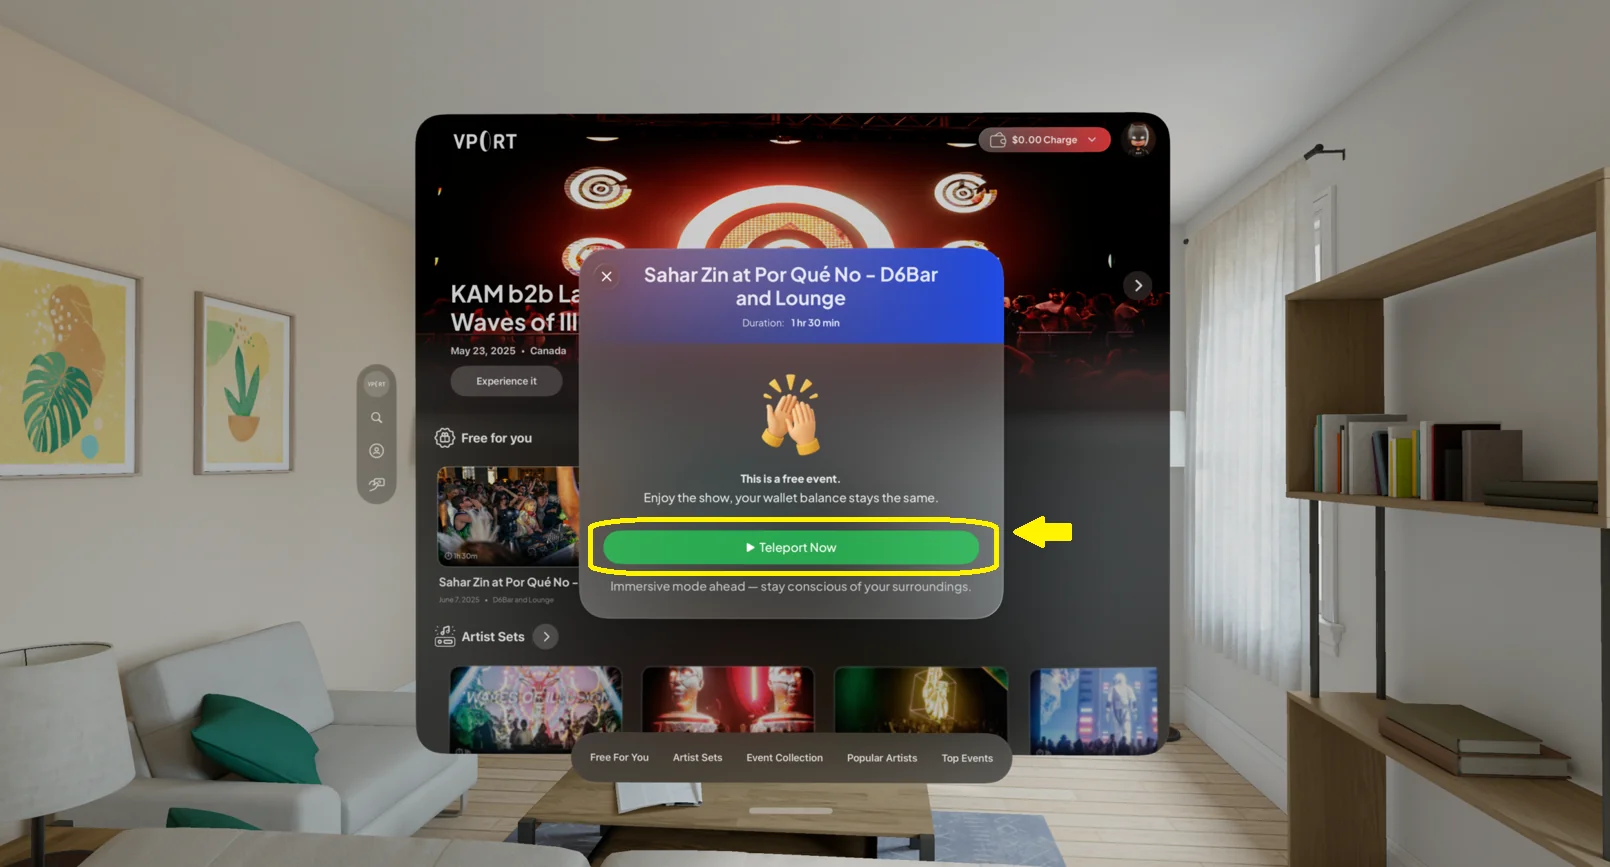
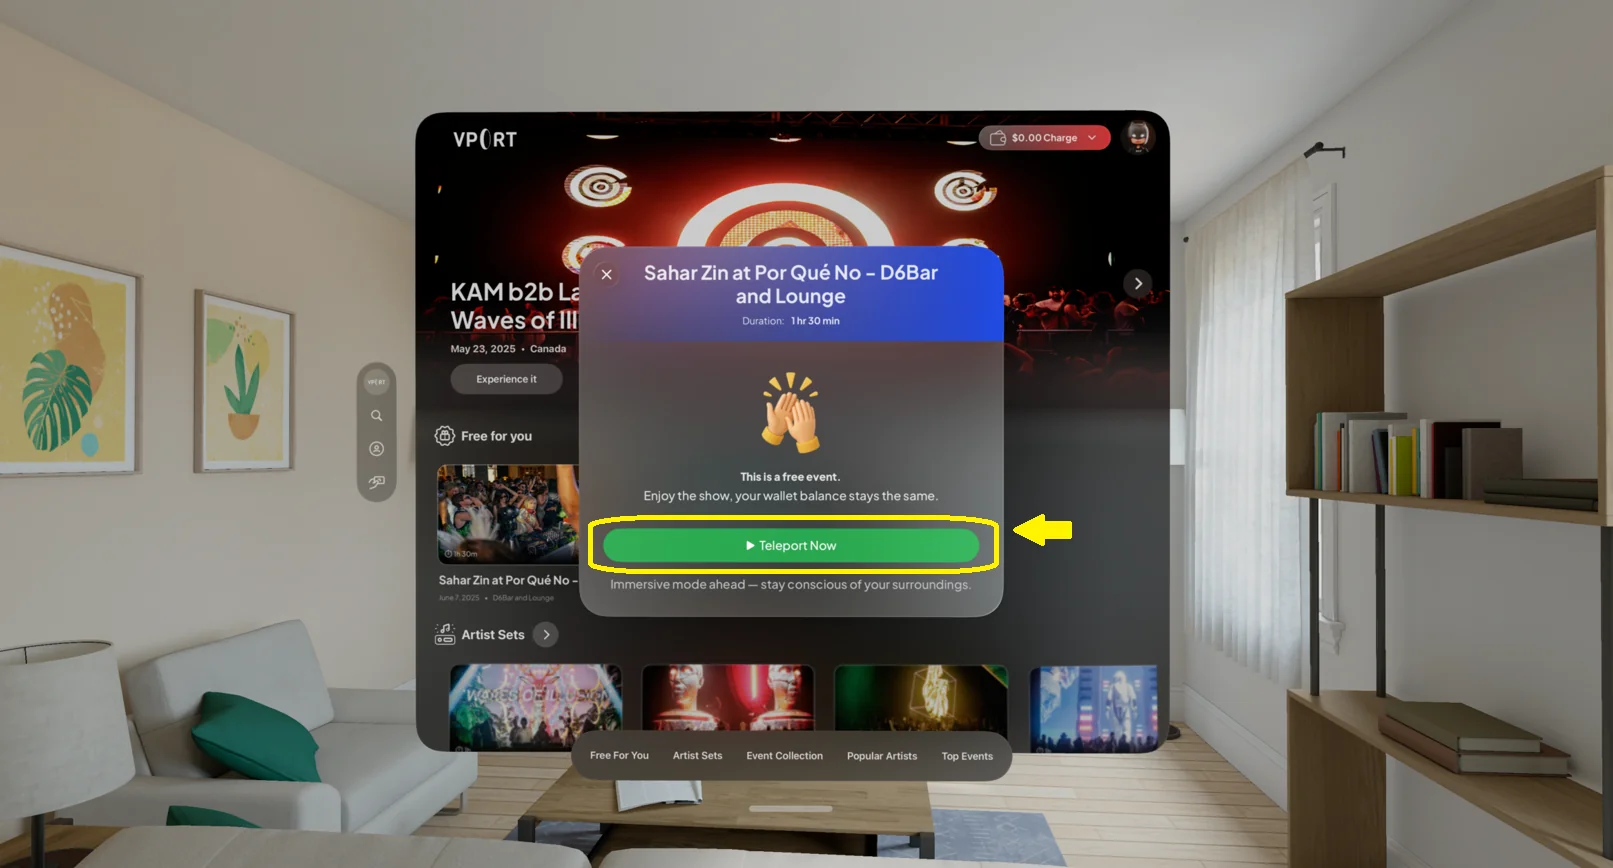
3.2.3 Free Event
You’ll see a celebratory message:
“This is a free event. Enjoy the show.”
Button: Teleport Now
Your balance will not be affected.
3.3 Playback Controls
Native Floating Player
Standard and spatial footage use the native visionOS player. Use its visible transport controls for play/pause and seeking. Open Info for the current event-instance details and VPORT's Report action.
Progressive Immersive Player
APMP, 180-degree, and 360-degree footage uses VPORT's immersive control window. It includes:
Play / Pause
- Look at Play/Pause → pinch to toggle.
Skip Forward / Backward (±30s)
- Look at the 30s icons → pinch to jump.
Timeline (Seek)
- Look at the timeline → pinch and drag to seek.
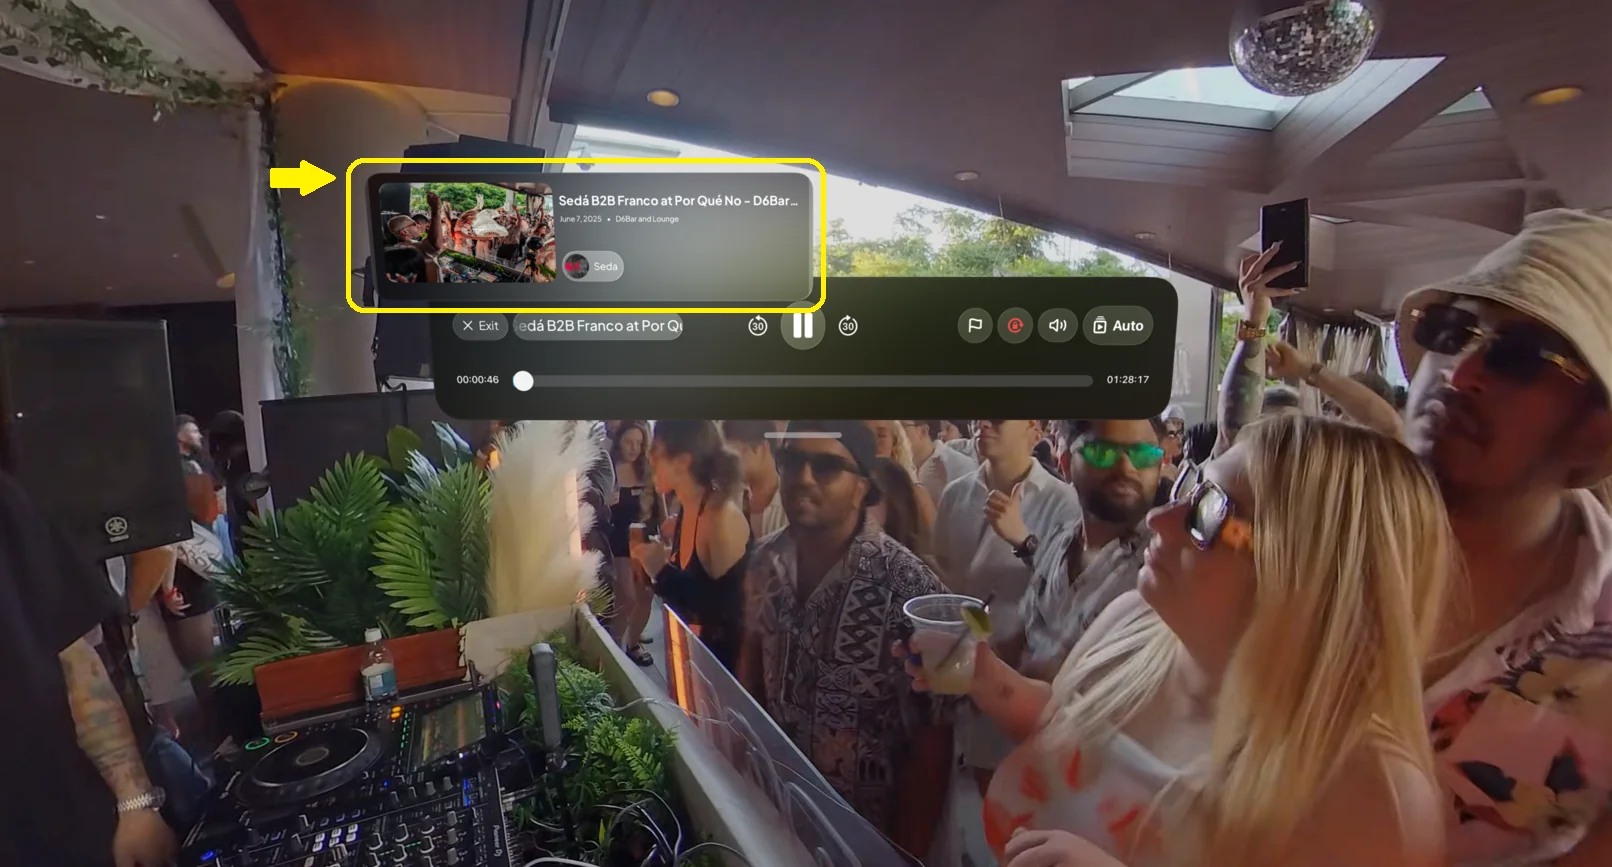
3.4 Viewing Event Info
- In the native floating player, open the Info tab. In immersive playback, look at the event name.
- Pinch to open the info panel.
- Review the event-instance information currently supplied to the player.
- Look away or pinch again to close.
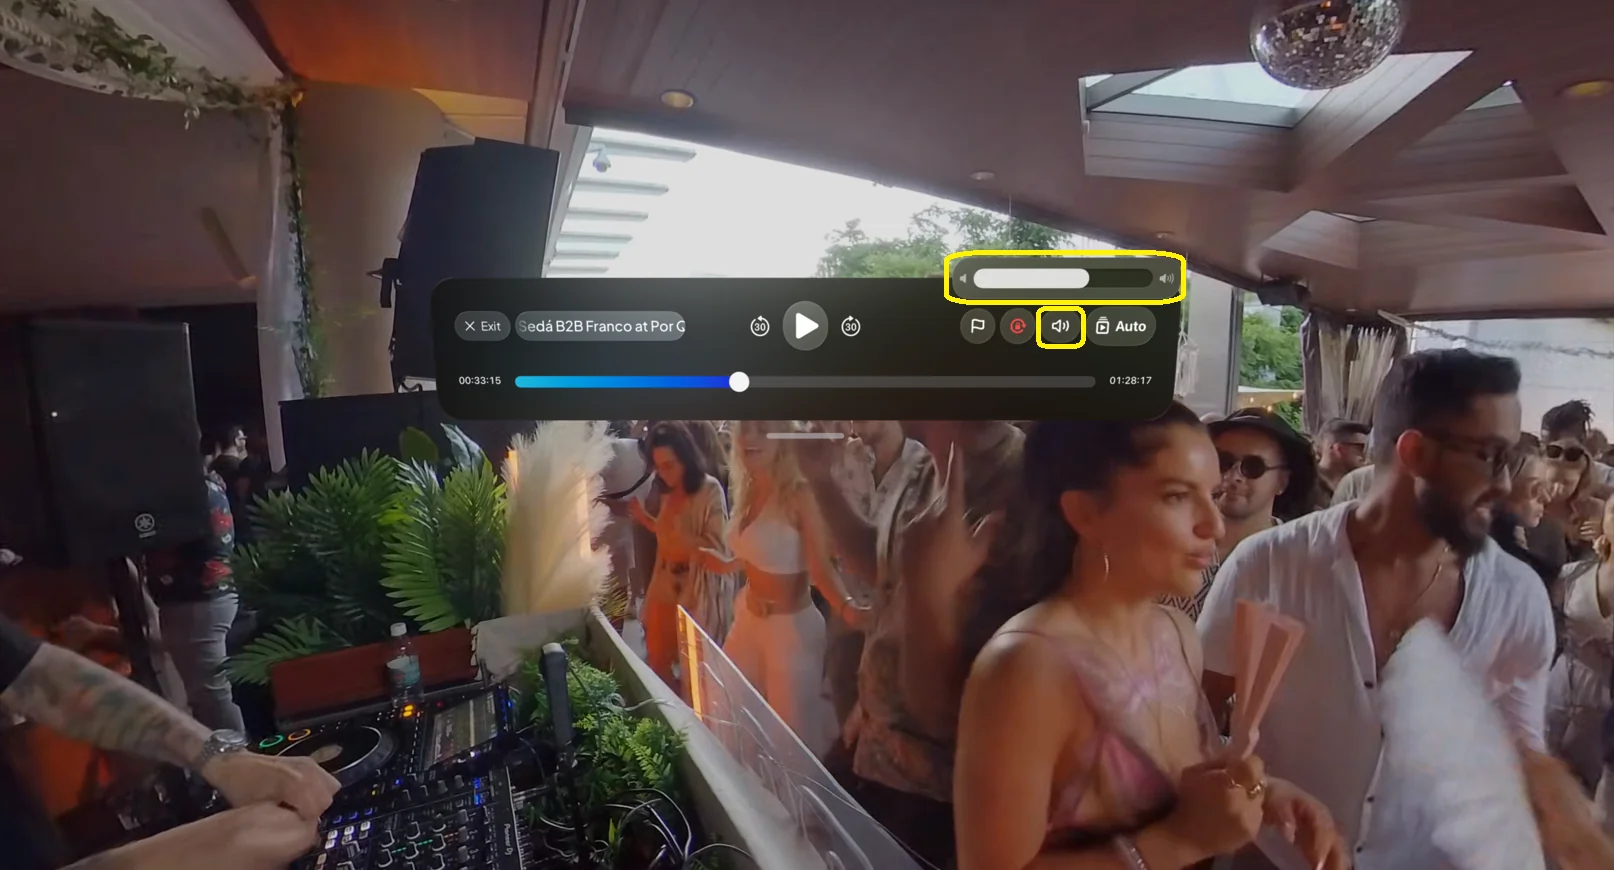
3.5 Adjusting Volume
- In immersive playback, look at the Volume icon.
- Pinch and adjust the popover slider.
- In the native floating player, use visionOS audio controls.
If you hear no audio, see troubleshooting.
3.6 Exiting the Player
You can exit via:
Immersive Exit Button
- Look → pinch to close and return.
Native Player Window Controls
- Use standard VisionOS “close” action.
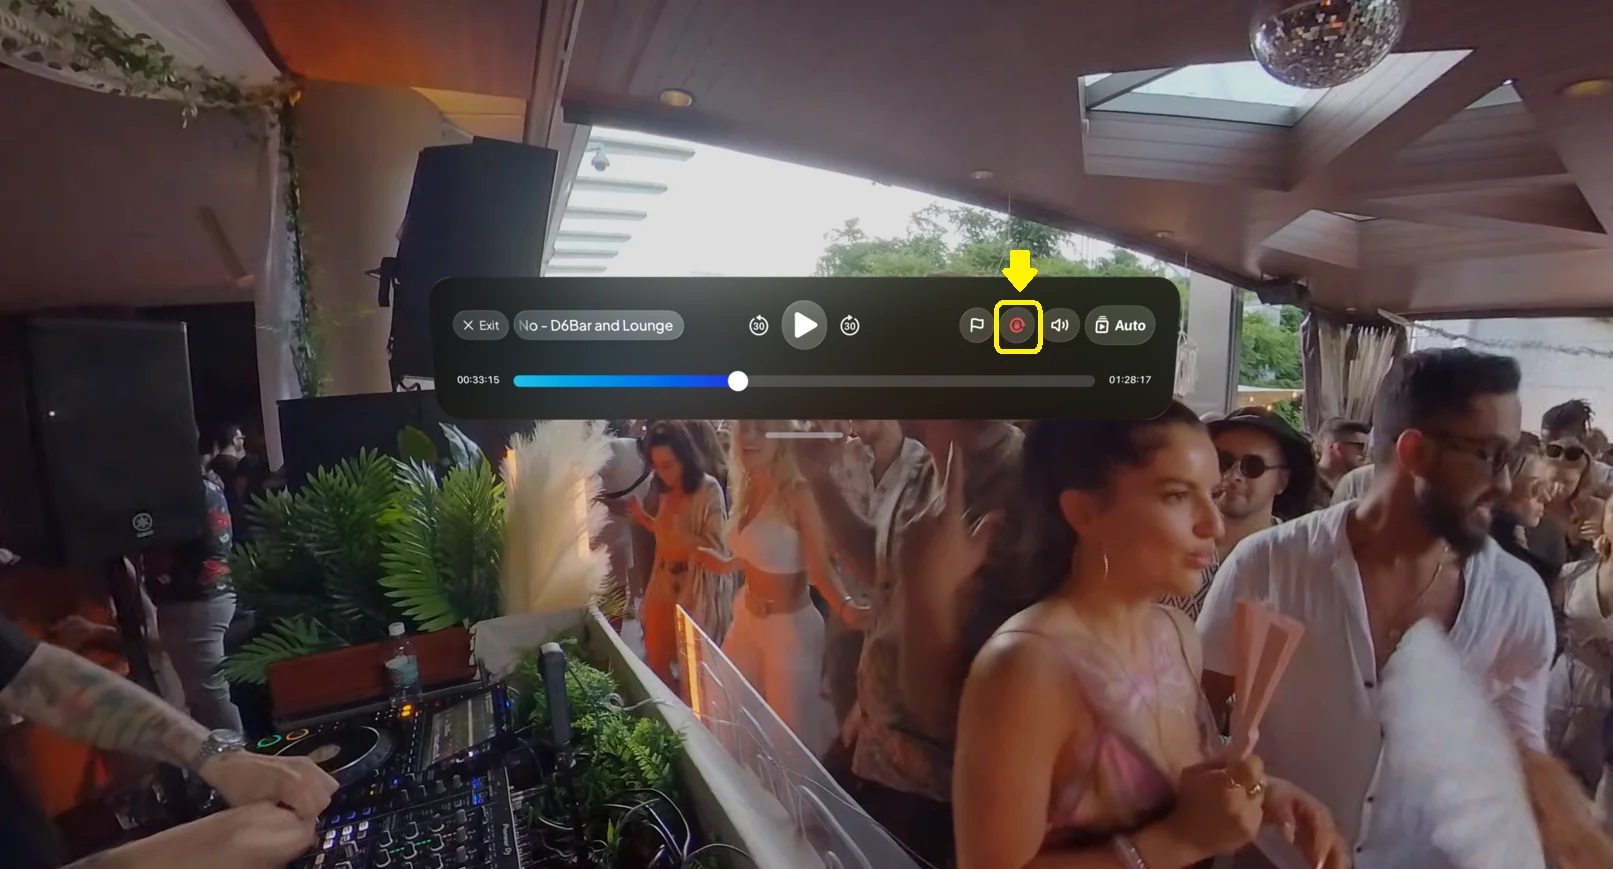
3.7 Lock Drag Rotation
For supported APMP, 180-degree, or 360-degree presentations:
- Look at the Lock Drag Rotation icon.
- Pinch to enable lock.
- Pinch again to disable.
This prevents further manual drag rotation. The control appears only where drag rotation applies; it does not replace the visionOS Digital Crown's system immersion control.
3.8 Reporting an Issue
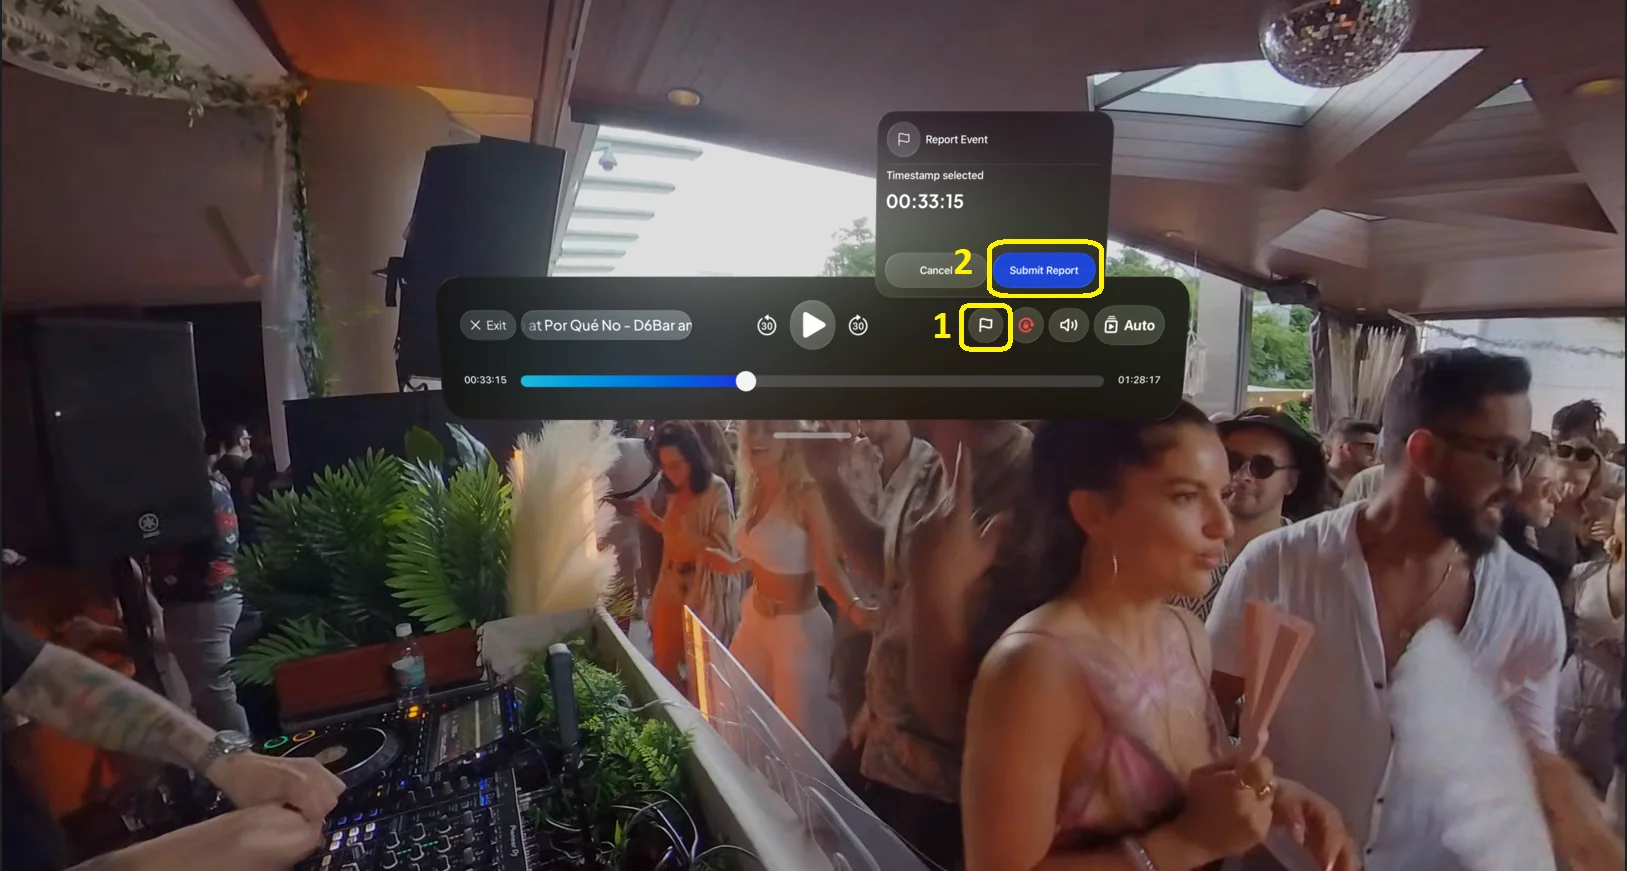
If you see/hear something wrong:
- In the native floating player, open Info and select Report. In the immersive player, select the Report icon.
- The report menu pauses active playback while you choose a reason.
- Select a reason.
- Confirm the report. VPORT supplies the current playback position with the report when available.
Reports help our team investigate issues faster.
3.9 Changing Video Quality
- During immersive playback, look at the Quality icon.
- Pinch to open the quality menu.
- Choose Auto or one of the renditions currently listed.
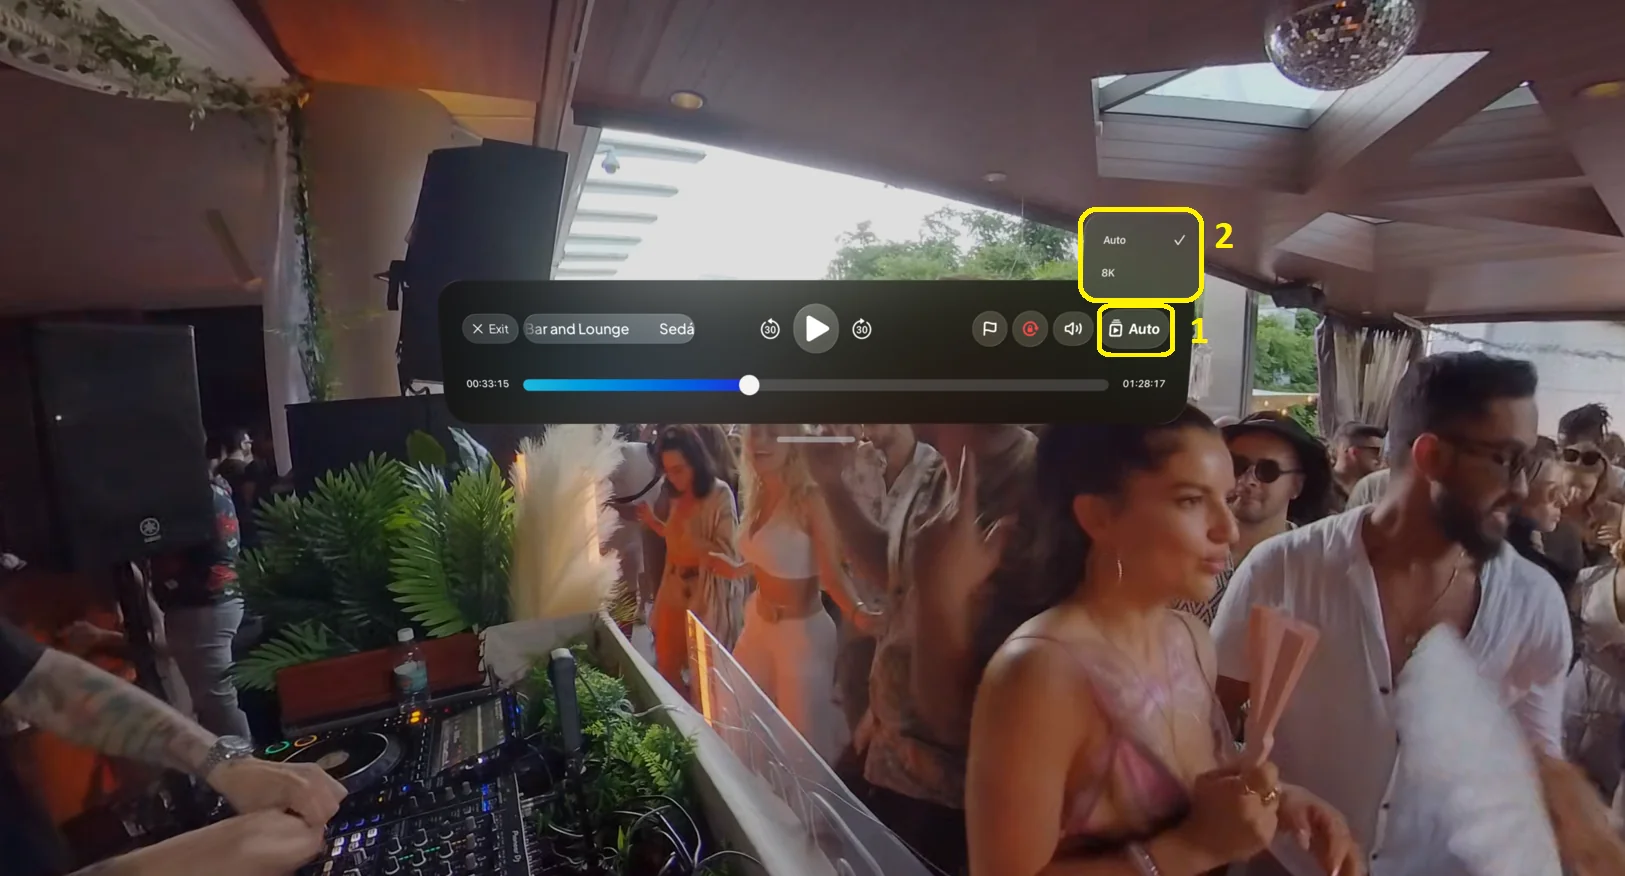
The quality control is disabled when the selected footage has no rendition list. VPORT does not guarantee fixed 8K or 4K choices for every event.
Controls vary by presentation
The current player exposes different VPORT controls by presentation:
| Presentation | Additional controls currently available |
|---|---|
| Native floating player | visionOS transport controls; VPORT Info tab and Report |
| Progressive immersive | Event info, Report, volume popover, available quality renditions, and Lock Drag Rotation |
A listed control can still be disabled when the selected footage does not supply the required capability.
3.10 Changing Immersion Level (VisionOS Feature)
Use the Digital Crown:
- Scroll one way → increase immersion
- Scroll the other → reduce immersion
This is a visionOS system control. It applies to the progressive immersive presentation.
Key Features
Feature 1: Spatial Concert Playback
Immersive concert experiences optimized for VisionOS.
Feature 2: VisionOS-native Controls
Gaze + pinch interactions—no controller required.
Feature 3: Quick Event Info
View full event details without leaving playback.
Feature 4: Lock Drag Rotation
Stops further manual drag rotation where that interaction is supported.
Feature 5: In-Player Reporting
Report audio/video/content issues instantly.
Feature 6: Wallet-aware Event Access
Modal shows pricing, duration, and balance before playback starts.
Common Issues & Troubleshooting
Issue 1: Video Won’t Play or Stuck on Loading
Possible causes:
- Weak Internet
- Temporary server issue
- Event hasn’t started (live events)
Try:
- Check Wi-Fi
- Close/reopen the event
- Confirm event start time
- Report the issue if persistent
Issue 2: No Audio
Possible causes:
- Low volume
- System output changed
- Temporary glitch
Try:
- Increase volume in player
- Check VisionOS system volume
- Pause → wait → Play
- Report if issue continues
Issue 3: Controls Not Responding
Possible causes:
- Gaze not aligned
- Pinch gesture not detected
- UI glitch
Try:
- Look directly at the control
- Pinch gently and hold briefly
- Close and reopen the player
- Restart Vport if unresponsive
Issue 4: Shaky or Uncomfortable Video
Possible causes:
- Immersion level too high
- Lock Drag Rotation disabled
Try:
- Enable Lock Drag Rotation when the control is available
- Reduce immersion with the Digital Crown
- Take a short break if discomfort continues
Issue 5: Blurry or Low Quality Video
Possible causes:
- Network drop
- Auto-quality adjusting
- Vision Pro lens issues
Try:
- Wait a few seconds
- Move closer to Wi-Fi router
- Clean lenses / adjust fit
- Contact Support if persistent across events